
0
Owner's of the Brother Photo Scanner Brother Photo Scanner gave it a score of 0 out of 5. Here's how the scores stacked up:
Prepare Your Network
42
4
Before Network Scanning 4
Network License (Windows
®
) 4
This product includes a computer license for up to two users.
This license supports the installation of the MFL-Pro Suite software including Nuance™ PaperPort™ 12SE
on up to 2 computers on the network.
If you want to use more than 2 computers with Nuance™ PaperPort™ 12SE installed, buy the Brother NL-5
pack which is a multiple computer license agreement pack for up to 5 additional users. To buy the NL-5 pack,
contact your Brother dealer.
Configure Network Scanning for Windows
®
4
If you are using a different machine than the one that was originally registered to your computer during the
installation of MFL-Pro Suite software, follow the steps below.
a (Windows
®
XP)
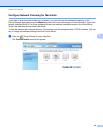
Click the Start button, Control Panel, Printers and Other Hardware, then Scanners and Cameras
(or Control Panel, Scanners and Cameras).
(Windows Vista
®
)
Click the button, Control Panel, Hardware and Sound, then Scanners and Cameras.
(Windows
®
7)
Click the button, All Programs, Brother, ADS-XXXXX (where XXXXX is your model name),
Scanner Settings, then Scanners and Cameras.
(Windows
®
8)
Click (Brother Utilities), and then click the drop-down list and select your model name (if not
already selected). Click SCAN in the left navigation bar, and then click Scanners and Cameras.
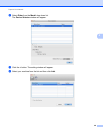
b Do one of the following:
Windows
®
XP
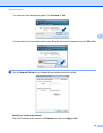
Right-click the Scanner Device icon and choose Properties.
The Network Scanner Properties dialog box appears.
Windows Vista
®
, Windows
®
7 and Windows
®
8
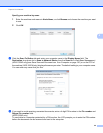
Click the Properties button.
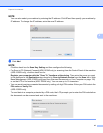
NOTE
(Windows Vista
®
, Windows
®
7 and Windows
®
8)
If the User Account Control screen appears, do the following:


Find Your Products By Category
Please Login
