
0
Owner's of the Brother Photo Scanner Brother Photo Scanner gave it a score of 0 out of 5. Here's how the scores stacked up:
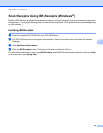
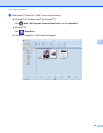

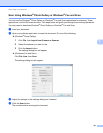
Scan Using Your Computer
98
5
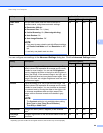
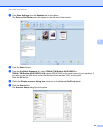
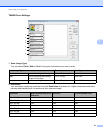
3 Scan Type
Select one of the following type:
Black & White
Use for text or line art images.
Gray (Error Diffusion)
Use for photographic images or graphics. (Error Diffusion is a method for creating simulated gray
images without using true gray dots. Black dots are put in a specific pattern to give a gray appearance.)
True Gray
Use for photographic images or graphics. This mode is more exact due to using up to 256 shades of
gray.
256 Color
Use for simple color illustrations that do not use the full color spectrum. Uses up to 256 colors to create
images.
24bit Color
Uses up to 16.8 million colors to scan the image. Although using 24bit Color creates an image with the
most accurate color reproduction, it requires the most memory and has the longest transfer time.
4 Reduce Noise
You can improve and enhance the quality of your scanned images with this selection. The Reduce Noise
setting is available when using 24bit Color and scan resolutions of 300 x 300 dpi, 400 x 400 dpi or 600 x
600 dpi.
5 Brightness
Adjust the setting (-50 to 50) to get the best image. The default value of 0 represents an average and is
usually suitable for most images. You can set the Brightness level by dragging the slider to the right or
left to lighten or darken the image. You can also enter a value in the box to set the level. If the scanned
image is too light, set a lower Brightness level and scan the document again. If the image is too dark, set
a higher Brightness level and scan the document again.
NOTE
The Brightness setting is only available when setting Scan Type to Black & White,
Gray (Error Diffusion), True Gray or 24bit Color.
6 Contrast
Adjust the setting (-50 to 50) to get the best image. The default value of 0 represents an average and is
usually suitable for most images. You can increase or decrease the contrast level by moving the slider to
the right or left. An increase emphasizes dark and light areas of the image, while a decrease reveals more
details in gray areas. You can also enter a value in the box to set the Contrast.
NOTE
The Contrast setting is only available when setting Scan Type to Gray (Error Diffusion), True Gray or
24bit Color.
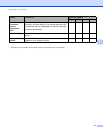
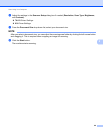
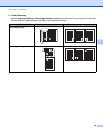
7 Document Size
Document size is set to Letter by default. For faster scan speeds, you can select the exact size of your
document from the Document Size drop-down list. If you select Custom, the Custom Document Size
dialog box appears in which you can specify the document size.


Find Your Products By Category
Please Login
