
0
Owner's of the JVC Camcorder JCV Everio High Definition Digital Camcorder gave it a score of 0 out of 5. Here's how the scores stacked up:

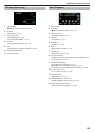
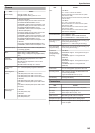


Error Message?
CHECK LENS COVER
Open the lens cover.
SET DATE/TIME!
Connect the AC adapter, charge the battery for more than 24 hours and set
the clock. (If the message still appears, the clock battery is exhausted.
Consult your nearest JVC dealer.)
“Clock Setting” (A p. 19)
COMMUNICATION ERROR
Reconnect the USB cable.
Turn off this unit and the devices connected to it, and turn them on again.
Reattach the battery pack.
FORMAT ERROR!
Check the operating procedure, and perform once again.
“FORMAT BUILT-IN MEM.” (A p. 130)
Turn off and on this unit again.
DATA DELETION ERROR
Check the operating procedure, and perform once again.
“ERASE ALL DATA” (A p. 131)
Turn off and on this unit again.
ERROR IN BUILT-IN MEMORY!
Turn off and on this unit again.
If the above does not solve the problem, back up your files and execute
“FORMAT BUILT-IN MEM.” in the “COMMON” menu. (All data will be
deleted.)
“FORMAT BUILT-IN MEM.” (A p. 130)
MEMORY CARD ERROR!
Turn off and on this unit again.
Remove the AC adapter and battery pack, then remove and re-insert the SD
card.
Remove any dirt from the SD card terminals.
If the above does not solve the problem, back up your files and execute
“FORMAT SD CARD” in the “COMMON” menu. (All data will be deleted.)
“FORMAT SD CARD” (A p. 131)
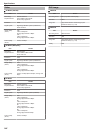
NOT FORMATTED
Select “OK”, then select “YES” on the “DO YOU WANT TO FORMAT?”
screen.
RECORDING FAILURE
Turn off and on this unit again.
PLAYBACK FAILED
Remove and re-insert the SD card.
“Inserting an SD Card” (A p. 16)
Remove any dirt from the SD card terminals.
Insert the SD card before turning on the power.
Do not subject this unit to any strong impact or vibration.
VIDEO MANAGEMENT FILE IS DAMAGED, RECOVERY IS
REQUIRED TO RECORD/PLAYBACK, RECOVER?
Select “OK” to restore. (Videos that cannot be restored will not be displayed
on the index screen, but you may be able to play them back using
“PLAYBACK OTHER FILE” in the menu.)
“Playing a Video with Defective Management Information” (A p. 54)
UNSUPPORTED FILE!
Use files recorded with this unit. (Files recorded with other devices may not
be playable.)
THIS FILE IS PROTECTED
Switch off the “PROTECT/CANCEL” function in the “EDIT” menu.
“Protecting Files” (A p. 66)
CHECK CARD'S WRITE PROTECTION SWITCH
Set the write protect switch of the SD card to off.
INSUFFICIENT AVAILABLE SPACE
Delete files, or move files to a PC or other devices.
Replace the SD card with a new one.
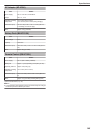
SCENE QUANTITY EXCEEDED LIMIT
A Move the files or folders to a PC or other device. (Back up your files.)
B Select “FILE + MANAGEMENT NO” in “FORMAT BUILT-IN MEM.” or
“FORMAT SD CARD” of the “COMMON” menu. (All data on the built-in
memory or SD card will be deleted.)
NUMBER OF FOLDERS OVERFLOW
A Move the files or folders to a PC or other device. (Back up your files.)
B Select “FILE + MANAGEMENT NO” in “FORMAT BUILT-IN MEM.” or
“FORMAT SD CARD” of the “COMMON” menu. (All data on the built-in
memory or SD card will be deleted.)
FILE QUANTITY LIMIT EXCEEDED
A Move the files or folders to a PC or other device. (Back up your files.)
B Select “FILE + MANAGEMENT NO” in “FORMAT BUILT-IN MEM.” or
“FORMAT SD CARD” of the “COMMON” menu. (All data on the built-in
memory or SD card will be deleted.)
CAMERA TEMPERATURE IS TOO COLD KEEP CAMERA
POWER ON PLEASE WAIT
Leave this unit turned on for a while.
If the warning still does not disappear, turn off the power and move the unit
to a warm place while taking care to avoid a sudden temperature change.
Turn on the power again after a while.
RECORDING CANCELLED
Set “REC MEDIA FOR VIDEO” to “SD”, then record to an SD card.
“REC MEDIA FOR VIDEO” (A p. 122)
Turn off and on this unit again.
Protect the unit from vibration and shock.
UNABLE TO RECORD PROPERLY IN 3D PLEASE SWITCH TO
2D FOR RECORDING
Consult your JVC dealer or the JVC service center.
TOO MUCH PARALLAX BETWEEN LEFT & RIGHT IMAGES.
YOU MAY NOT BE ABLE TO VIEW THE 3D IMAGES
Check the shooting distance during 3D recording such that recording is
performed within the optimal zone.
“Precautions on Recording and Playing Back 3D Images” (A p. 11)
Troubleshooting
141


Find Your Products By Category
Please Login
