
0
Owner's of the First Alert Weather Radio Public Alert Radio gave it a score of 0 out of 5. Here's how the scores stacked up:


12
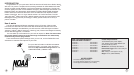
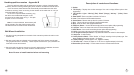
1. Choosing a place for your radio
Your WX-150 is designed for desktop or wall mount installation. Place the unit where it
can receive an emergency alert signal broadcast and where you can hear its alert tone or
see the message indicator lights. The best location to install the WX-150 is:
- Clear of any obstructions.
- Near windows or large openings.
- Near an AC power outlet
- Near to where the user(s) would normally stay, such as a bedroom, living room or
ofce.
• Keep the receiver away from interference sources e.g. motors, computers, TV or
microwave ovens.
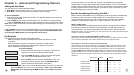
The WX-150 has a 17” telescopic antenna. Fully extend the antenna. Adjust by moving.
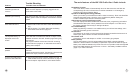
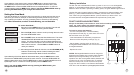
2. Connecting the Power
USING A STANDARD 120V AC OUTLET
1. Plug the AC adapter cord into the 12V DC
input jack on the back of the unit.
2. Plug the adapter into the wall outlet.
Note: The internal battery charger
will automatically begin to charge the
batteries* if the “Rechargeable” setting is
selected. Keep the unit plugged in at all
times. The unit will be ready to use in the
event of a power failure.
* Do not charge alkaline batteries.
VEHICLE USE (12V DC)
Use an optional 12V DC car adapter (not included). Plug the adapter cord into the 12V DC
input jack on the back of the unit. Plug the other end into your vehicle’s cigarette lighter or
accessory outlet.
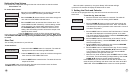
Setting up your Public Alert
TM
radio
Chapter 1 - Basic Operation
21
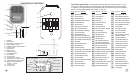
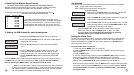
Adding Alerts
The WX-150 provides the ability to add up to 4 new alerts. This feature allows you to
update your WX-150 in the event that NOAA changes or adds alerts to the message
menu in the future. The alerts you add must have the same exact 3 letter code used
by NOAA for your radio to respond properly.
To add a new alert:
1. Press and hold the MENU button for 3 seconds. The radio will
display the main menu list showing ALERT MODE.
2. Press the DOWN () button 4 times to scroll up through the
main menu list to the ADD ALERTS menu.
3. Press the NEXT button to enter the ADD ALERTS menu. The
words NEW EVENT followed by a new event number and a
3 letter code (dashes) will be displayed. The event number
will be ashing. Use the UP/DOWN (/) buttons to select
the new event (1-4) you want to add.
4. Press the NEXT button. The rst letter of the 3 letter code will
begin ashing. Use the UP/DOWN (/) buttons to assign
the code letter. For example: The 3 letter code for Tornado
Warning is “TOR”. Once you have selected the rst letter,
press the NEXT button and follow the same sequence to set
the second and third letters respectively.
5. Upon completion of the 3 letter code, press the NEXT button
to create the message that will accompany the warning. You
can insert a 15 character letter/number text string. Use the
UP/DOWN (/) buttons to assign a letter or number to
each of the 15 spaces. Press the PREV or NEXT buttons to
advance or retreat within the text string.
5. Upon completion of the message you must assign a warning
level to the new alert. Press the UP/DOWN (/) buttons to
select one of the following 3 levels: WARNING, WATCH or
ADVISORY.
A AAA AAAAA 1
NEW EVENT 1 AAA
NEW EVENT 1 - - -
ADD ALERTS
ALERT MODE
LEVEL ADVISORY


Find Your Products By Category
Please Login
