
4.1
Owner's of the Dirt Devil Vacuum Cleaner Dirt Devil Dd Quick Lite Plus Bagless Up gave it a score of 4.1 out of 5. Here's how the scores stacked up:


BACK
ARRIÈRE
PARTE
POSTERIOR
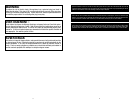
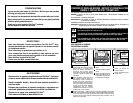
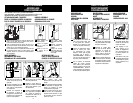
Tip bottom of dirt cup
into cleaner and push
forward.Dirtcup lidwillsnapinto
handle.
14 15
Insérez la poignée
dans le corps de
l’aspirateur.
Appuyez fermement
pour enclencher la
poignée.
HOW TO ASSEMBLE
ASSEMBLAGE
CÓMO ENSAMBLAR
Insert handle into
bodyofcleaner.
Push down firmly
untilhandlelocksinto
place.
1.
2.
2.
1.
Inserte el asa en
el cuerpo de la
aspiradora.
Empuje con firmeza
haciaabajohastaque
el asa quede trabada
ensulugar.
E E
EE E
E
E E E
F
F
F
F
F
F
F
F
F
S
S
S
S
S
S
S
S
S
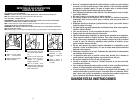
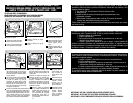
ATTACH DIRT CUP
FIXER LE VIDE-POUSSIÈRE
COLOQUE EL DEPÓSITO DE POLVO
Squeeze the hose tabs and
inserthoseintothehosecon-
nectiontothedirtcuponthe
right side.
Pincerleslanguettesdutuyau
etinsérerletuyaudanslerac-
cord jusqu’au vide-poussière
surlecôtédroit.
Presione las lengüetas de
la manguera e inserte la
mangueraenlaconexióndela
mangueraconelrecipientede
polvoenelladoderecho.
Wraphosearoundhoseguide
(A) andinsert endinto lower
hoseclogcleanout(B).
Enrouler le tuyau autour du
guide(A)etinsérerl’extrémité
dansletuyauinférieur/porte
anti-obstruction.
Enrollelamangueraalrededor
de laguía para la manguera
(A) e inserte el extremo en
la limpieza de atascos de la
manguerainferior(B).
1.
HOSE ASSEMBLY
ASSEMBLAGE DU TUYAU
ENSAMBLAJEDELAMANGUERA
HANDLE ASSEMBLY
ASSEMBLAGE DE LA POIGNÉE
ENSAMBLAJEDELASA
Inclinezlefonddugodetàpoussière
dans l’aspirateur et appuyez vers
l’avant. Le couvercle du godet
s’enclenchedanslapoignée.
Inclinelaparteinferiordelrecipi-
ente de polvoen la aspiradora y
empújelo haciaadelante. Latapa
del recipiente de polvo entraráa
presiónenelasa.
A
B
Branchez le cordon dans
une prisede courant.Mettez
l’aspirateur en marche en
appuyant sur la pédale de
marche située à l’arrière de
l’aspirateurducôtégauche.
Pour dégager la poi-
gnée, appuyez sur la
pédale de dégagement
delapoignéesituéesur
la partie inférieure de
l’aspirateur.
Tournez le déclencheur instan-
tané du cordon pour facili-
ter l’enlèvement du cordon.
Rangez le cordon dansle guide
du cordon (voir la section «
CARACTÉRISTIQUES»,numéro2)
pourqu’ilnevous gênepaslor-
squevouspassezl’aspirateur.
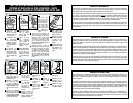
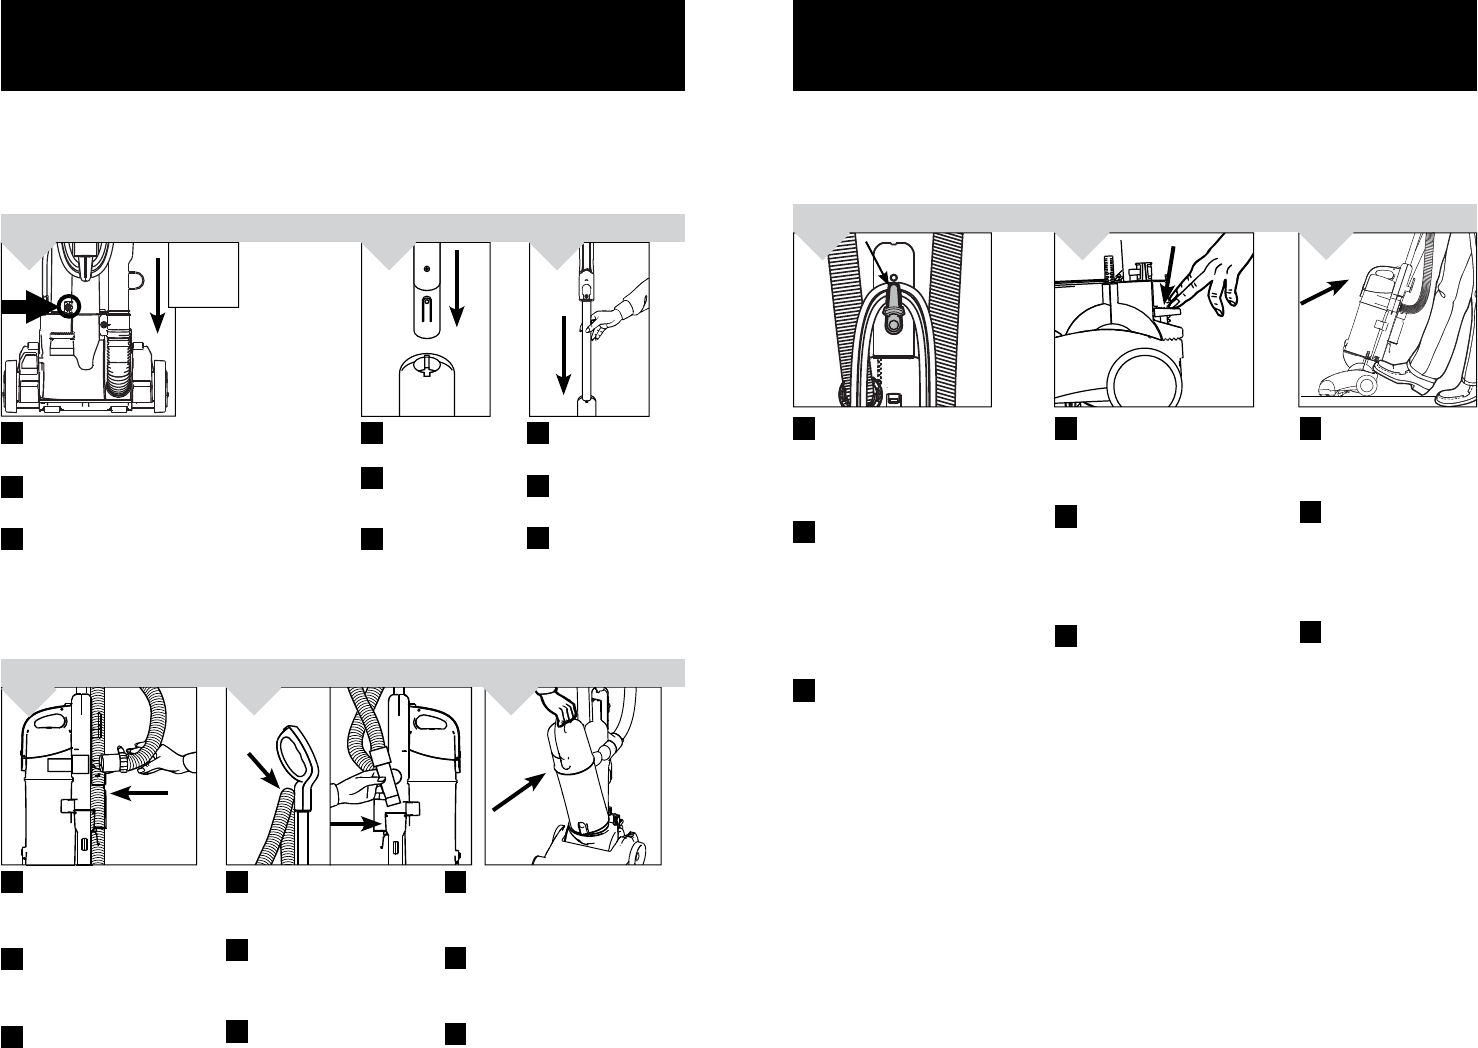
HOW TO OPERATE
FONCTIONNEMENT
FUNCIONAMIENTO
Plugcordintoelectricaloutlet.
Turncleaneronbydepressing
footpedallocatedontheback
leftsideofthecleaner.
ON/OFF PEDAL
INTERRUPTEUR MARCHE/
ARRÊT
INTERRUPTOR
ENCENDIDO / APAGADO
2.
HANDLE RELEASE
DÉGAGEMENT DE LA
POIGNÉE
LIBERACIÓN DEL ASA
3.
Torelease handle,push
thehandlereleasepedal
locatedonthelowerleft
sideofthecleaner.
CORD RELEASE
DÉCLENCHEUR DU
CORDON
LIBERACIÓN DEL CORDÓN
ELÉCTRICO
Turn the QuickCord Releasefor
easy cord removal. Store cord
in cord guide (see “features”,
Diagram 2 for location) to keep
outofthewaywhilevacuuming.
1.
Gire el gancho de liberación
rápida del cordón eléctrico
para retirarlo más fácilmente.
Guardeelcordónenlaguía(vea
“CARACTERÍSTICAS”, número 2
paralaubicación)paramantener-
lofueradelpasomientrasaspira.
Conecteelcordóneléctricoen
latomadecorriente.Encienda
laaspiradorapisandoelpedal
localizadoenlaparteposterior
izquierdadelaaspiradora.
Paraliberar elasa, pise
elpedaldeliberacióndel
asa localizadoenlaparte
inferior izquierda de la
aspiradora.
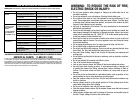
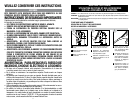
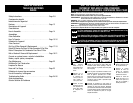
TOOLREQUIRED:PHILLIPSORFLATHEADSCREWDRIVER
OUTILNÉCESSAIRE:TOURNEVISÀPOINTECRUCIFORMEOUÀTÊTEPLATE
HERRAMIENTANECESARIA:DESTORNILLADORPHILLIPSOPLANO
Attachthebackpaneltothenozzlesothatthelower
hoseis ontheright side.Tosecure, insertone(1)
screwintothebackofthecleaner.
Fijeelpaneltraseroalaboquillademaneratalque
la manguerainferior estéen el ladoderecho. Para
asegurar,inserteun(1)tornilloenlaparteposterior
delaaspiradora.
Fixer le panneau arrière au suceur de façon à ce
queletuyauinférieursoitducôtédroit.Pourlefixer,
insérerune(1)visàl’arrièredel’appareil.
ATTACHBACKPANEL TO NOZZLE
FIXER LE PANNEAU ARRIÈRE AU SUCEUR
FIJEELPANELTRASEROALABOQUILLA
1.


Find Your Products By Category
Please Login
