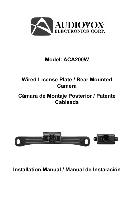

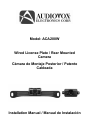
0
Owner's of the Audiovox Fish Finder Aca200w gave it a score of 0 out of 5. Here's how the scores stacked up:
7
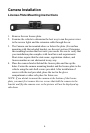
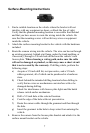
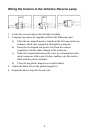
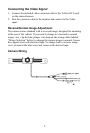
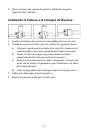
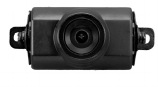
Surface Mounting Instructions
1. Find a suitable location on the vehicle where the bracket will not
interfere with any equipment or doors, or block the line of sight.
Verify that the planned mounting location is accessible from behind
and that you have access to route the wiring inside the vehicle. Be
sure that the mounting screws will not hit any wires or equipment
inside the vehicle.
2. Attach the surface mounting bracket to the vehicle with the hardware
included.
3. Route the camera wiring into the vehicle. The wire can be run through
an existing grommet, behind a tail lamp, under the trunk molding, or
if necessary, through a 5/8 inch hole drilled near the vehicle’s rear
license plate. When choosing a wiring path, make sure the cable
will not be damaged or pinched, as this may cause a short circuit
that is not covered by the warranty. If drilling a hole, perform the
following steps:
a) Acquire a 5/8 inch drill bit, rust preventive, and a 5/8 inch
rubber grommet, all of which can be purchased at a hardware
store.
b) Check behind the intended drilling location before drilling to
verify that no wires or mechanisms can interfere with or be
damaged during drilling.
c) Check for interference with license plate lights and the hatch
release switch and/or mechanism.
d) Drill a 5/8 inch hole at the selected location.
e) Coat the edge of the hole with rust preventative.
f) Route the camera cable through the grommet and then through
the hole.
g) Insert the grommet in the hole to keep water from entering the
vehicle.
4. Remove the camera from the license plate bracket and attach it to the
surface mount bracket on the vehicle.


Find Your Products By Category
Please Login
