
3.0
Owner's of the AT&T Cordless Telephone ML17939 gave it a score of 3.0 out of 5. Here's how the scores stacked up:
Getting started
6
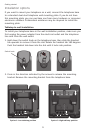
Telephone installation
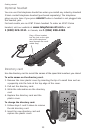
Connect the telephone line cord(s) and the power cord to the telephone base.
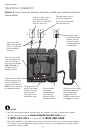
If you subscribe to high speed Internet service (DSL - digital subscriber line)
through your telephone line, you must install a DSL filter between each
telephone line cord and telephone wall jack. The filter prevents noise and
caller ID problems caused by DSL interference. Please contact your DSL service
provider for more information about DSL filters.
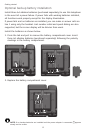
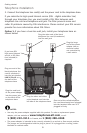
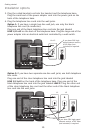
Option 1:
If you have a two-line wall jack, install your telephone base as
shown below.
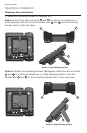
2.
Plug the other end of the
coiled handset cord into the
left side of the telephone base.
Plug the small end
of the power adapter
into the power jack
on the back of the
telephone base.
Plug one end of the
black telephone line
cord (4-conductor)
into the jack labeled
LINE 1/L1+L2 on
the back of the
telephone base.
Plug the other end of the black
telephone line cord (4-conductor)
into the wall jack.
Plug the large
end of the power
adapter into an
electrical outlet
not controlled by
a wall switch.
If you have DSL
high speed Internet
service, a DSL filter
(not included) is
required.
NOTES:
Use only the power adapter supplied with this product. To order a replacement power
adapter, visit our website at www.telephones.att.com, or call
1 (800) 222-3111. In Canada, dial 1 (866) 288-4268.
The power adapter is intended to be correctly oriented in a vertical or floor mount position.
The prongs are not designed to hold the plug in place if it is plugged into a ceiling, under-
the-table or cabinet outlet.
•
•
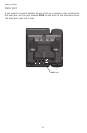
L1+L2
One end of the coiled telephone
line cord has already been plugged
into the handset. Make sure it is
plugged in firmly.


Find Your Products By Category
Please Login
