
4.2
Owner's of the Alpine Car Stereo System Bluetooth CD Receiver gave it a score of 4.2 out of 5. Here's how the scores stacked up:


9-EN
Accessory List
• Head Unit..................................................................................1
• Power Cable ..............................................................................1
• Microphone ..............................................................................1
• Mounting Sleeve ......................................................................1
• Carrying Case............................................................................1
• Bracket key ...............................................................................2
• Screw (M5 × 8) ..........................................................................4
• Owner’s Manual..................................................................1 set
Turning Power On and Off
Press SOURCE to turn on the unit.
Note
• The unit can be turned on by pressing any other button except and
e (Release).
Press and hold SOURCE for at least 2 seconds to turn
off the unit.
Note
• The first time power is turned on, the volume will start from level 12.
Source Selection
Press SOURCE to change the source.
TUNER DISC USB AUDIO/iPod
*1
PANDORA
*2
BT AUDIO
*3
AUXILIARY
*4
TUNER
*1 Displayed only when the iPod/iPhone is connected.
*2 The Pandora
®
source can be displayed only when PANDORA is
set to ON. For details, refer to “Setting the Pandora
®
Source” on
page 20.
*3 Displayed only when AUDIO is set to ON, refer to “Setting the
BLUETOOTH Connection (BT IN)” on page 22.
*4 Refer to “Using the Front AUX Input Terminal” on page 18.
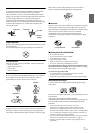
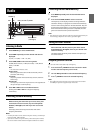
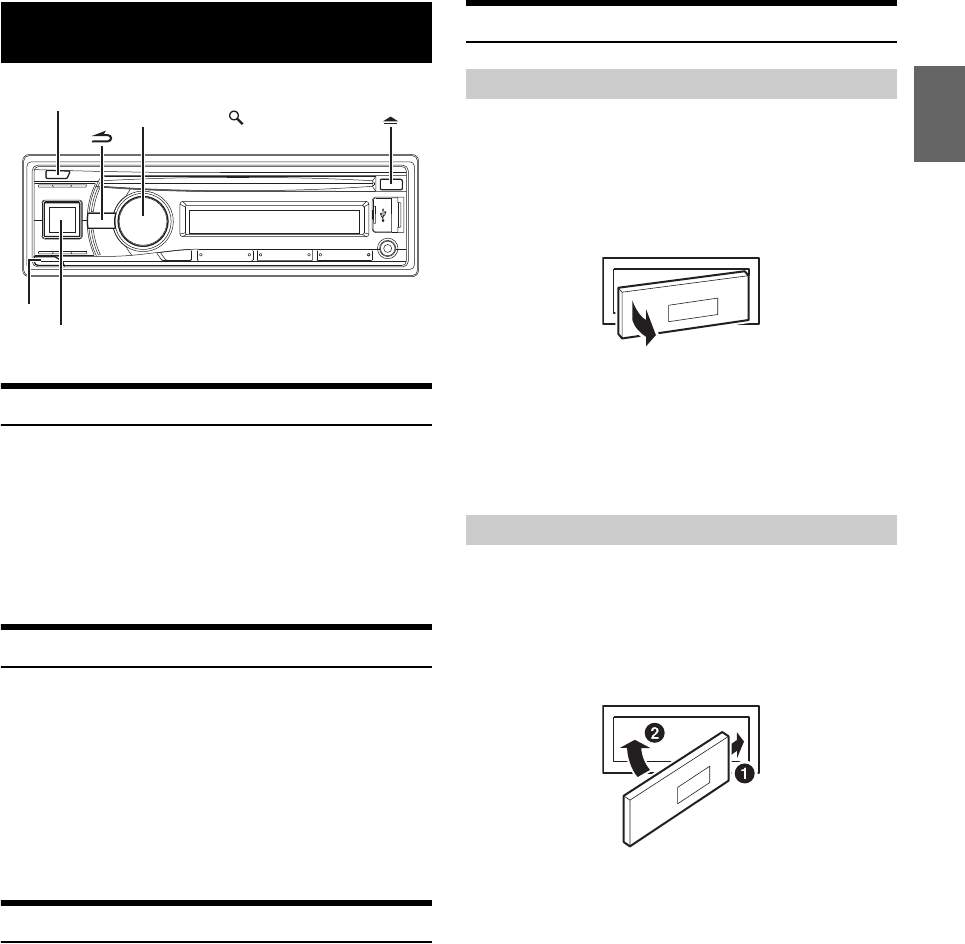
Detaching and Attaching the Front Panel
1
Turn off the unit power.
2
Press e (Release) at the lower left side until the front
panel pops out.
3
Grasp the left side of the front panel and pull it out.
Notes
• The front panel may become hot in normal usage (especially the
connector terminals on the back of the front panel). This is not a
malfunction.
• To protect the front panel, place it in the supplied carrying case.
• When detaching the front panel, do not apply excessive force as it may
result in malfunction.
1
Insert the right side of the front panel into the main unit.
Align the groove on the front panel with the projections
on the main unit.
2
Push the left side of the front panel until it locks firmly into
the main unit.
Notes
• Before attaching the front panel, make sure that there is no dirt or dust
on the connector terminals and no foreign object between the front
panel and the main unit.
• Attach the front panel carefully, holding the sides of the front panel to
avoid pushing buttons by mistake.
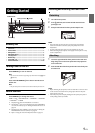
Getting Started
SOURCE/
e
AUDIO/SETUP
Rotary encoder/
/ENTER
Detaching
Attaching


Find Your Products By Category
Please Login
