
4.1
Owner's of the Whirlpool Convection Oven GH7208XR gave it a score of 4.1 out of 5. Here's how the scores stacked up:

12
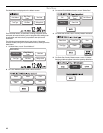
Settings & Info
Oven features may be activated and/or changed, and display
characteristics may be adjusted using the “Settings & Info”
menu. Following is a brief description of each option.
1. On Main Menu, touch “Settings & Info.”
2. Touch desired option (touch “More Choices” for more
categories), then follow the instructions on the screen to
select and/or adjust settings.
Clock
This is a standard 12-hour clock (12:00 AM-11:59 PM), or a
24-hour clock (0:00-23:59). When power is first supplied to the
oven, or after a power failure, the “Welcome” screen will appear,
asking whether you would like to set the clock. If you choose to
set the clock at that time, the display will take you directly to the
Clock screen. If you choose not to set the clock, the time of day
will default to 12:00 p.m., and the clock will be displayed and
continue to keep time. The clock format defaults to 12-hour, and
to Daylight Savings OFF.
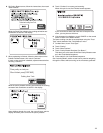
To Set Clock:
1. On Main Menu, touch “Settings & Info.”
2. On Settings & Info screen, touch “Clock.”
3. On Clock screen, touch “Adjust Time,” and follow the
instructions to set the time of day, and select AM or PM (if
setting in standard format).
To Change Format/Daylight Savings Settings: On Clock
screen, select either “Standard” (12-hour) or “Military” (24-hour),
and/or select “Daylight Savings ON” or “Daylight Savings OFF,”
then touch “OK.”
To Hide Clock: On Clock screen, touch “Adjust Time,” and then
touch “Hide Clock.” The display will immediately return to the
Main Menu.
Date
The date may be set and displayed on the Main Menu screen.
The default setting is Jan. 1.
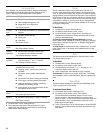
To Set Date:
1. On Main Menu, touch “Settings & Info.”
2. On Settings & Info screen, touch “Date.”
3. On Date screen, use Month “+” or “-” and Day “+” or “-”
controls to set the month and day.
4. Touch “Adjust Year,' and change the year, if desired.
To Hide Date: On Date screen, touch “Hide Date.” The display
will immediately return to the Main Menu. Repeat to display the
date.
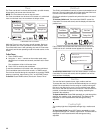
Demo Mode
The Demo Mode highlights the features and capabilities of the
oven in a slide show on the display.
To Activate Demo Mode:
1. On the Main Menu, touch “Settings & Info.”
2. On Settings & Info screen, touch “Demo Mode.”
The demonstration immediately begins. You can move
forward or back in the demonstration by touching “Next
Page” or “Back,” or wait for the screen to advance. When the
demonstration is over, it automatically loops back to the
beginning and starts again.
3. Touch “Cancel Demo” on the touch screen, or touch CANCEL
control to cancel Demo Mode and return the display to the
Main Menu.
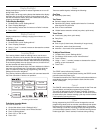
OPTION SETTING
Clock
■ Choose format: Standard or Military.
■ Turn Daylight Savings on or off.
■ Adjust time: set or hide clock.
See “Clock” section.
Contact
Info
■ Find contact information: toll-free number and
website.
Date
■ Set date: month and day.
■ Adjust year.
■ Hide date.
See “Date” section.
Demo
Mode
■ View sales demonstration.
See “Demo Mode” section.
Display
Backlight
■ Set backlight brightness: reduce after
2 minutes or turn off after 2 minutes.
See “Display Backlight” section.
Display
Contrast
■ Set level of contrast between minimum and
maximum using “+” and “-” controls.
See “Display Contrast” section
Hints View comprehensive lists of hints for general
operation and care of oven:
■ Cleaning: cavity, control panel, odors and
turntable.
■ Cookware: covers, depth, materials and
shape.
■ Convection Conversion: baking and roasting.
■ Food: eggs, moisture, quantity and shape.
■ Methods: arranging, covering, defrosting,
standing and proofing dough.
■ Power levels: list of microwave power levels
and sample foods for each.
Learning
Mode
■ Turn on or off.
See “Learning Mode” section.
Volume
■ Set tone volume using “+” and “-” controls.
See “Tones” section.


Find Your Products By Category
Please Login
