
4.6
Owner's of the Vivitar Camcorder DVR 850W gave it a score of 4.6 out of 5. Here's how the scores stacked up:


14
Setting the Date and Time
To set the time and date that will appear on the photos you capture.
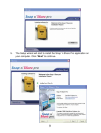
1. Turn the Power on to enter the DV mode.
2. Press the OK/Menu button.
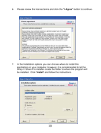
3. Press the Left/Right/Up/Down button on the OK dial to select the Setup
Mode icon from the menu icons that appear.
4. Press the OK/Menu button.
5. Press the Left/Right/Up/Down button on the OK dial and select the
Date/Time
icon submenu option.
6. Press the OK/Menu button.
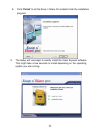
7. Press the Left/Right button to highlight and select the Year, Month, Day,
24H, Hour and Minutes options you desire to change.
8. Press the Up/Down button to change the digits for each of the date or
time options you desire to update.
9. Press the OK button to save the date and time you selected.
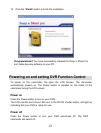
10. Press the DC/DV mode button to close the menu and press it again to exit
the Setup mode function.
Changing the camcorder`s modes
There are four modes in this DVR camcorder.
1. Press the Power button to turn on the camcorder.
2. The DV (Video) default capture mode appears on the LCD.
3. Press the DC (Camera) mode button to change from the video to the
camera mode.
4. Press the DV mode button to revert back to the video mode.


Find Your Products By Category
Please Login
