

0
Owner's of the Viking Gas Grill VGBQ33603REN gave it a score of 0 out of 5. Here's how the scores stacked up:


Any piece of equipment works better and lasts longer when maintained
properly and kept clean. Grilling equipment is no exception. Your grill
must be kept clean and maintained properly. Viking highly recommends
cleaning the grill after each use. A Viking grill cover (sold separately)
should also be strongly considered in order to protect your grill from the
elements.
Stainless Steel Maintenance in Outdoor Environments
Viking outdoor grills are made of the finest grades of stainless steel.
However, the stainless steel must be maintained properly over the life of
the unit to preserve its elegant appearance and optimal performance.
Below are some helpful tips:
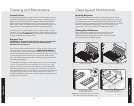
• Wipe down any exterior grease spatters after each use of the grill.
• Regularly wipe down the exterior of the grill with a micro-fiber cloth.
• Use a designated stainless steel cleaner to clean and polish exterior
surfaces. Some household cleaners are not suitable for stainless steel.
• Never place a cover on a damp grill. Make sure the grill is completely
dry before covering.
• Under certain conditions, such as salty environments near a coastline,
or around pools with high chlorine content, small amounts of surface
rust may accumulate on stainless steel parts. Small amounts of surface
rust can easily be removed by applying Soft Scrub® Gel to a damp
sponge and wiping with the stainless steel grain. When dealing with
hard to remove stains, use a non-metallic abrasive pad (A Scotch Brite
pad for example) along with your stainless steel cleaner, and scrub in
the grain direction of the stainless. It is important to wipe with the
grain for the most efficient removal of staining.
• In extreme cases, it may be beneficial to apply a rust inhibitor
coating to the exterior of the grill. Consult your local contractor
before applying.
IMPORTANT: These tips will help you achieve the maximum life span of
your grill. It is important to understand that stainless steel generally has a
higher resistance to the effects of environmental exposure, but it will still
be affected by the elements. Stainless steel has the potential to degrade
just like all other architectural metals. The Limited Lifetime Warranty
(page 33) covers rust through of stainless steel parts. It does not cover
occasional surface rust and staining. It is important to follow the steps
detailed above to guard against these natural occurrences and address
them promptly should they arise.
Cleaning and Maintenance
23
Product Care
22
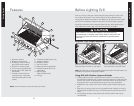
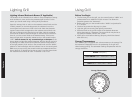
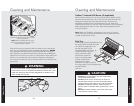
To load the skewer, slide one of the rotisserie forks (prongs facing away
from the end) onto the skewer. Push the skewer through the center of the
food, then slide the second rotisserie fork (prongs toward the food) onto
the skewer. Center the product to be cooked on the skewer then push
the forks firmly toward the food. Tighten the wing nuts with pliers. It may
also be necessary to wrap the food with butcher’s string to secure loose
portions. Never use nylon or plastic string. Once the food is secure, insert
the skewer into the motor. To turn on rotisserie motor, flip the ON/OFF
switch located on the rotisserie motor assembly.
If needed, remove the grill grates. Place the basting pan beneath the
food. Keep canopy closed while using the rotisserie. Each peek adds
about 15 minutes to the cooking time. A meat thermometer should be
used when cooking large pieces of meat to ensure that the meats are
rare, medium, and well cooked.
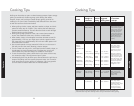
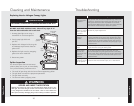
Rotisserie Cooking Chart
Rotisserie
Operation
Food
Weight
Control
setting
Suggested
cooking time*
Internal
temperature
Beef rib roast 4 – 6 lbs. Med-High Rare
14 – 16 min./lb.
Medium
23 – 25 min./lb.
145˚F
160˚F
Bnls tip roast 4 – 6 lbs. Med-High Rare
14 – 16 min./lb.
Medium
23 – 25 min./lb.
145˚F
160˚F
Bone-in pork butt 3 – 5 lbs Med-Low 15 – 18 min./lb. 170˚F
Bnls pork loin 3 – 5 lbs Med 22 – 25 min./lb. 170˚F
Smoked ham half 5 – 7 lbs Med 22 – 25 min./lb. 170˚F
Chicken
Whole fryer
Quarters
2 – 4 lbs Med
Med-High
25 – 30 min./lb.
20 – 22 min./lb.
180˚F
180˚F
Turkey
Whole
Breast
12 – 14 lbs
5 – 6 lbs
Med-High
Med-High
16 – 18 min./lb.
22 – 25 min./lb.
180˚F
170˚F
Cornish hens 1-1/2 – 2 lbs. Med 22 – 25 min./lb. 180˚F
*The above information is given as a guide only. You may need to vary the heat
settings and times due to factors such as weather, climate and/or personal
requirements.


Find Your Products By Category
Please Login
