
0
Owner's of the Kenwood Car Video System Kenwood MONITOR WITH DVD RECEIVER gave it a score of 0 out of 5. Here's how the scores stacked up:


ENGLISH 55
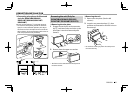
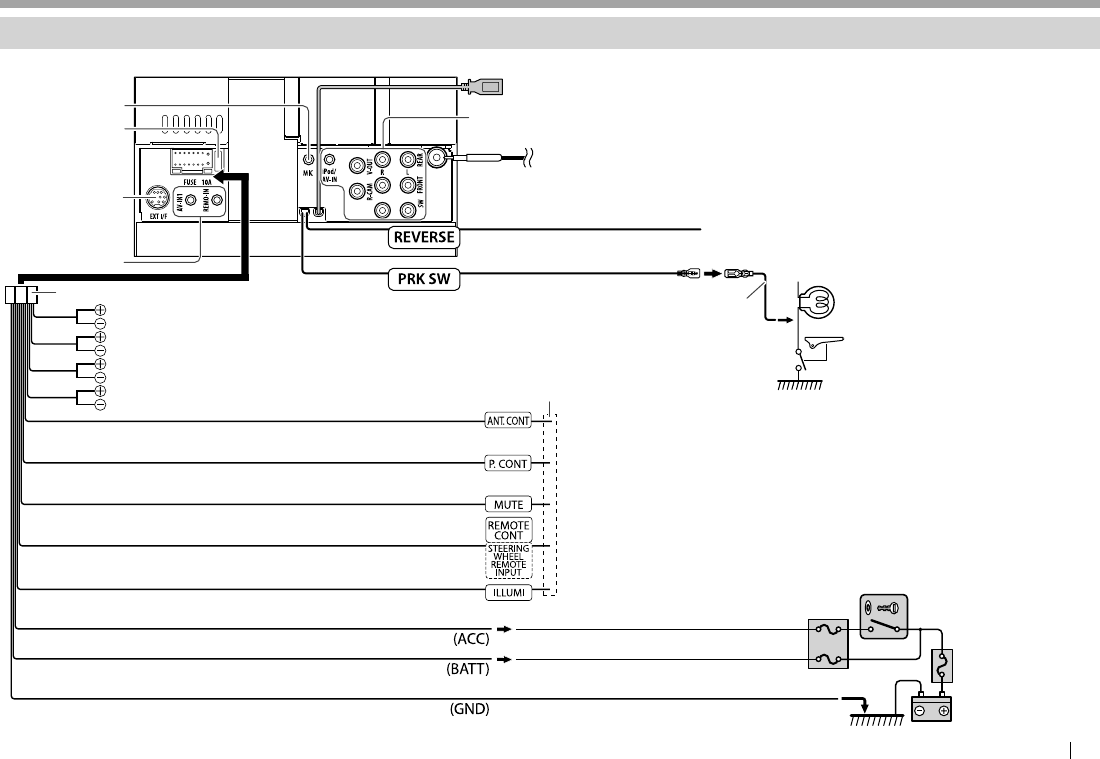
CONNECTION/INSTALLATIONCONNECTION/INSTALLATION
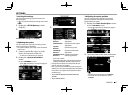
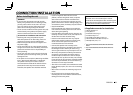
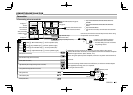
Connection
R Connecting wires to terminals
See page56.
See page57.*
1
USB terminal (0.8 m): See page56.
10 A fuse
Ignition key switch
Fuse box
Battery
Connect to the vehicle’s reverse lamp harness when using
the optional rear view camera.
Connect to the vehicle’s parking
brake detection switch harness.
• For best safety, be sure to connect
th
e parking sensor.
Depending on what antenna you are using, connect either to the control
terminal of the motor antenna, or to the power terminal for the booster amplifier
of the film-type antenna. (Max. 300 mA, 12 V)
When
using the optional power amplifier, connect to its power control terminal.
Not used.
To use the steering wheel remote control feature, an exclusive remote adapter
(not supplied) matching your car is required.
To car
light control switch
To car chassis
Purple with white stripe
(Reverse sensor wire)
Light green (Parking sensor wire)
Connect SiriusXM
Connect Vehicle
Tuner (commercially
available). See page
56.*
2
3
1
White ª / White with black stripe · : To front speaker (left)
Gray ª / Gray with black stripe · : To front speaker (right)
Green ª / Green with black stripe · : To rear speaker (left)
Purple ª / Purple with black stripe · : To rear speaker (right)
Blue (Antenna control wire)
Blue with white stripe (Power control wire)
Brown (Mute control wire)
Light blue with yellow stripe (Steering remote control wire)
Orange with white stripe (Dimmer control wire)
Red (Ignition wire)
Yellow (Battery wire)
Black (Ground wire)
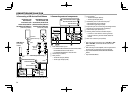
*
1
Only for DDX672BH/DDX492/DDX415BT/DDX392/DDX372BT/
DDX320BT.
*
2
Only for DDX672BH/DDX492/DDX392/DDX372BT/DDX320BT/
DDX272.
*
3
Only for DDX415BT/DDX315.
*
4
If no connections are made, do not let the cable come out from the
tab.
*
4
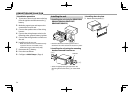
See page56.*
3
Connect the antenna cord
to the antenna terminal.


Find Your Products By Category
Please Login
