
0
Owner's of the Garmin GPS Receiver Garmin Nuvi GPS gave it a score of 0 out of 5. Here's how the scores stacked up:


Driving Tips
• Drive the speed limit. In most vehicles, you will achieve
optimal fuel economy between 45 mph and 60 mph.
• Drive a consistent speed.
• Brake and accelerate gradually and consistently.
• Avoid stop-and-go traffic and rush hour.
• Do not rest your foot on the brake pedal.
• Use the cruise control.
• Turn your vehicle off instead of idling for temporary stops.
• Combine small trips into one longer trip with multiple stops.
• Turn off the air conditioner and open your windows, unless
you are traveling at high speeds on the highway.
• Tighten your gas cap.
• Park in the shade or in the garage.
• Unload excess weight. Remove unneeded items from your
vehicle.
• Avoid carrying items on your roof. Remove rooftop carriers
and removable racks when not in use.
• Maintain the recommended tire pressure. Check tire
pressure regularly and before long trips.
• Keep your vehicle well-tuned, and follow the vehicle
manufacturer’s recommended maintenance intervals.
• Change your oil, oil filters, and air filters regularly.
• Use the lowest recommended suitable grade of fuel. Use
biofuels when feasible, such as E85 and biodiesel.
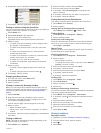
Planning a Trip
You can use the trip planner to create and save a trip with
multiple destinations.
1
Select Apps > Trip Planner.
2
Select New Trip.
3
Select Select Start Location.
4
Search for a location (Finding a Location by Category).
5
Select Select.
6
To add additional locations, select .
7
Select Next.
8
Enter a name, and select Done.
Scheduling a Trip
You can use the trip planner to create and save a trip with
multiple destinations.
1
Select Apps > Trip Planner.
2
Select a trip.
3
Select a location.
4
Select an option:
• Select Departure Time.
• Select Arrival Time.
5
Select a date and time, and select Save.
6
Select Duration.
7
Select the amount of time you will spend at the location, and
select Save.
8
If necessary, repeat steps 3–7 for each location.
Navigating to a Saved Trip
1
Select Apps > Trip Planner.
2
Select a saved trip.
3
Select Go!.
4
If prompted, select a route (Your Route on the Map).
Editing a Saved Trip
1
Select Apps > Trip Planner.
2
Select a saved trip.
3
Select .
4
Select an option:
• Select Rename Trip.
• Select Edit Destinations to add and delete a location, or
to change the order of locations.
• Select Delete Trip.
• Select Optimize Order to arrange the stops on your trip
in the most-efficient order.
Viewing Previous Routes and Destinations
Before you can use this feature, you must enable the travel
history feature (Device and Privacy Settings).
You can view your previous routes and places you have
stopped on the map.
Select Apps > Where I've Been.
Data Management
You can store files on your device. The device has a memory
card slot for additional data storage.
NOTE: The device is not compatible with Windows 95, 98, Me,
Windows NT
®
, and Mac OS 10.3 and earlier.
File Types
The device supports these file types.
• Maps and GPX waypoint files from myGarmin™ mapping
software, including MapSource
®
, BaseCamp™, and
HomePort™ (Custom Points of Interest).
• GPI custom POI files from Garmin POI Loader (Installing POI
Loader).
About Memory Cards
You can purchase memory cards from an electronics supplier,
or purchase pre-loaded Garmin mapping software
(www.garmin.com). In addition to map and data storage, the
memory card can be used to store files such as maps, images,
geocaches, routes, waypoints, and custom POIs.
Installing a Memory Card
The device supports microSD™ and microSDHC memory cards.
1
Insert a memory card into the slot on the device.
2
Press it in until it clicks.
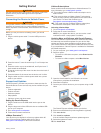
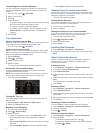
Connecting the Device to Your Computer
You can connect the device to your computer using a USB
cable.
1
Plug the small end of the USB cable into the port on the
device.
2
Plug the larger end of the USB cable into a port on your
computer.
A picture of your device connected to a computer appears on
the device screen.
Depending on your computer operating system, the device
appears as either a portable device, a removable drive, or a
removable volume.
Transferring Data From Your Computer
1
Connect the device to your computer (Connecting the Device
to Your Computer).
Data Management 9


Find Your Products By Category
Please Login
