
4.8
Owner's of the Bosch Appliances Washer/Dryer Bosch Appliances Washer/Dryer gave it a score of 4.8 out of 5. Here's how the scores stacked up:


15
Grounding Instructions
This appliance must be grounded. In the event of
malfunction or breakdown, grounding will reduce the risk
of electric shock by providing a path of least resistance
for the electric current. This appliance is equipped with a
cord that has an equipment grounding conductor and a
grounding plug. The plug must be plugged into an
appropriate outlet that is properly installed and grounded
in accordance with all local codes and ordinances.
Important Points
▯ Do not modify the plug provided with the appliance. If
the plug will not fit into the outlet have a properly
grounded outlet installed by a qualified electrician. Do
not cut, remove or bypass the grounding prong on the
washer power cord plug.
▯ The washer power cord plug must be easily
accessible when the washer is operating.
▯ When unplugging or plugging in the washer power
cord, grasp the plug. Do not pull on the power cord to
unplug the washer.
▯ The household electrical supply must be suitable for
the voltage specification shown on the washer rating
plate (located inside the washer door, immediately
below the drum opening).
~ Purchase information; Page 4
See the table below for connection specfications and
fuse/breaker requirements.
▯ The wiring for the electrical outlet circuit must be
sufficient to meet the appliance requirements. Use of a
Ground Fault Circuit Interrupter (GFCI) is
recommended.
▯ Protect the power cord from physical damage, such as
being twisted, kinked, pinched, caught in a door, or
walked upon.
▯ If the power cord is damaged, it must be replaced by a
qualified person to avoid a fire/shock hazard.
Replacement power cords are available through
Customer Service.
~ Customer service; Page 4
▯ The washing machine must only be connected to an
individual branch circuit via a socket which has been
properly installed and grounded.
▯ Make sure that:
- the power plug fits into the socket
- the wire size is sufficient
- the grounding system is properly installed:
▯ The power cord may be replaced by an electrican
only. Replacement power cords are available from
Customer Service. To reduce the risk of fire or
electrical shock, DO NOT use an extension cord or an
adapter to connect the washing machine to the power
supply. If a ground fault circuit breaker is to be used,
only use the types marked with the following symbol:
z. Only this symbol can guarantee compliance with
all current regulations.
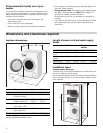
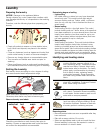
Transporting the washer
Before transporting the washer
1.
Disconnect the washer power cord from the wall
outlet.
2.
Turn off the water supply to the washer.
3.
Disconnect water supply lines from the tap.
4.
Disconnect the drain hose from the drain location.
5.
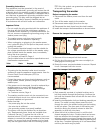
Install the transport bolt assemblies as shown below.
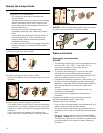
Remove the transport bolt hole covers
1.
Remove all four transport bolt hole covers.
2.
Pull the tip of the arrow on the cover out slightly to
disengage the locking tab.
3.
Rotate the cover counterclockwise to remove. Repeat
for all 4 transport bolt hole covers.
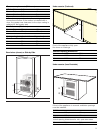
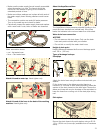
Insert the transport bolt assemblies
1.
Each assembly consists of a plastic bushing and a
bolt that extends through the bushings. Unscrew the
bolt until the threaded end is flush with the end of the
plastic bushing.
2.
Insert the transportation bolt and bushing assembly as
shown. The metal housing slides around the bolt
through the slot in the plastic bushing as the bushing
is slid into place. The open part of the bushing slot
should be facing the direction shown to allow the
assembly to slide fully into place.
3.
When the bolt is in place screw it in until the bolt
threads engage the drum. Double check and ensure
bolts are screwed into threaded holes and not into
adjecent cracks or crevices. Repeat the process for all
4 transportation bolt assemblies before tightening any
all the way. Complete tightening all 4 bolt assemblies
until they are each snug in place.
Volts Hertz Ampers Watts
208 - 240 60 12 2.880 max.


Find Your Products By Category
Please Login
