
3.3
Owner's of the Apple Computer Drive Apple Time Capsule - 2TB - ME177LL/A (June 2013 Release) gave it a score of 3.3 out of 5. Here's how the scores stacked up:
Chapter 2 Setting Up Your AirPort Time Capsule 13
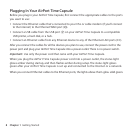
Setting Advanced Options
To set advanced options, use AirPort Utility on your computer or download AirPort Utility for
iOS from the App Store. You can set up a new AirPort Time Capsule or congure advanced
settings, such as advanced security options, closed networks, DHCP lease time, access control,
IPv6, and more.
To set advanced options or make changes to a network you’ve already set up:
1 Choose the wireless network you want to change.
 On a Mac, use the Wi-Fi status menu in the menu bar.
 On an iOS device, choose the network in Wi-Fi settings.
If you haven’t set up your AirPort Time Capsule, the default network name is Apple Network
XXXXXX, where XXXXXX is the last six digits of the AirPort ID.
2 Open AirPort Utility.
3 Select the AirPort Time Capsule you want, then click Edit.
4 If you’re prompted for a password, enter it.
5 Adjust the settings you want for your AirPort Time Capsule and your network.
Using Time Machine with Your AirPort Time Capsule
With the Time Machine application you can back up all your Mac computers, including your
photos, music, movies, and documents.
After you set up Time Machine, it automatically backs up your computer on a regular basis.
If you’re using Mac OS X v10.5.7 or later, the rst time you connect to your AirPort Time Capsule,
Time Machine asks if you’d like to use it to back up your computer. Click “Use as Backup Disk,”
and Time Machine takes care of the rest.


Find Your Products By Category
Please Login
